The Gadget's Blog

The Gadget's Blog
Showing posts with label Tips. Show all posts

Saturday, May 21, 2011

Honeycomb 101: Getting to Know Your Android Tablet


So you're the proud possessor of a shiny new Android tablet. Now what?
Google's tablet operating system is a little different from the versions of Android you may have seen before. Unlike the iPad, which is basically a blown-up version of the iPhone, Android Honeycomb tablets are designed to take full advantage of the extra screen space--and it's up to you to decide how to use it.
Of course, flexibility and simplicity don't always go hand in hand, and Honeycomb can be a bit overwhelming at first. But once you get the hang of it, you'll find that its power and its potential for personalization can be pretty darn sweet.
Here's a quick guide to help you get started.

Hello, Honeycomb: Navigating Your Home Screen

Android Honeycomb home screen; click for full-size image.The Android Honeycomb home screen keeps all of the OS's main controls visible on your tablet's display.Let's begin with the home screen. On Honeycomb--unlike on past smartphone-focused editions of Android--the main controls are always visible right on your display.
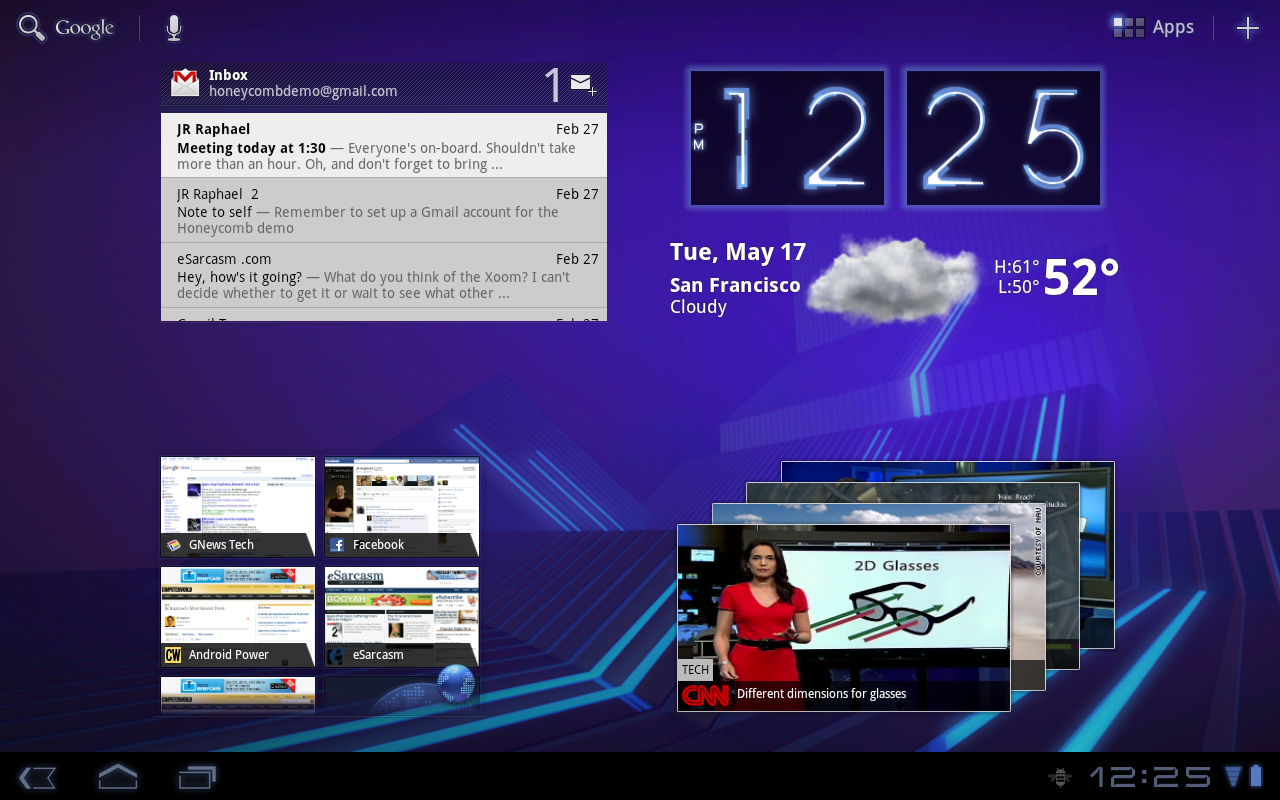
  • At the top left corner of the screen sits a Google search box. Tapping it lets you simultaneously search the Internet and everything on your device.
  • Next to the search box is a microphone icon that activates Google's robust Voice Actions system. You can use it to speak commands such as "listen to" followed by the name of an artist, album, or song; "send e-mail to" followed by the name of a contact and a message; or even "note to self" followed by a memo. You can also speak any phrase to launch an instant Web search for the term.
  • At the top right of the screen is a six-square icon with the label 'Apps'. Touch it for access to the full menu of applications installed on your tablet.
  • Next to the 'Apps' icon is a large white plus sign. It opens the tool for customizing your tablet's home screens; we'll look at it in more detail in a moment.
  • System clock and nearby features; click for full-size image.The system clock, network connection icon, and battery level icon are in the lower-right portion of the home screen. Double-tapping this area brings up other options.At the bottom right of the display is a system clock, along with icons indicating your current network connection status and tablet battery level. Tapping this area once will bring up more-detailed information. Tapping it a second time will bring up additional options, including toggles for airplane mode, Wi-Fi, and other system settings.
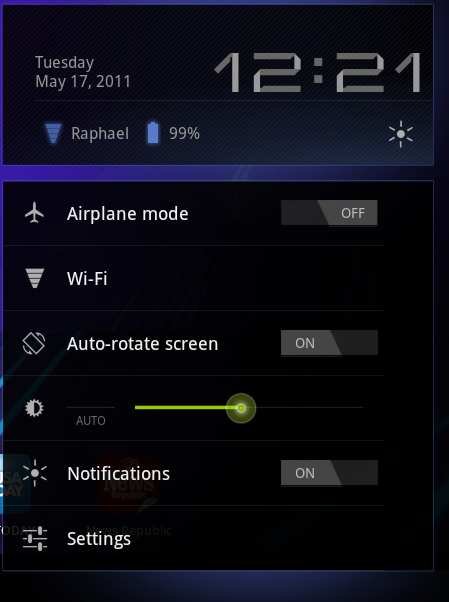
From time to time, notifications will appear in the bottom-right area of your display--when you get a new e-mail message, for example, or when a calendar reminder comes due. You can tap any notification to view more information about it or you can dismiss it altogether.

Getting Around in Honeycomb

Honeycomb navigation options; click for full-size image.The main navigation options in Honeycomb are back, home, and multitasking.The area at the bottom left of the screen focuses on navigation. No matter where you are in the system, you'll always see three icons:
  • The left arrow jumps you back one step--not terribly useful on the home screen, but handy when you're in applications.
  • The home icon, predictably, takes you back to the home screen. If your tablet is running Android 3.1, your system will remember which panel you last had open and will automatically return you there.
  • Honeycomb multitasking menu; click for full-size image.Honeycomb's multitasking menu shows a list of recently apps; clicking an entry lets you jump directly to it.The third icon opens the Honeycomb multitasking menu. This menu shows you a list of your most recently used apps and allows you to jump directly to any of them from anywhere in the system.
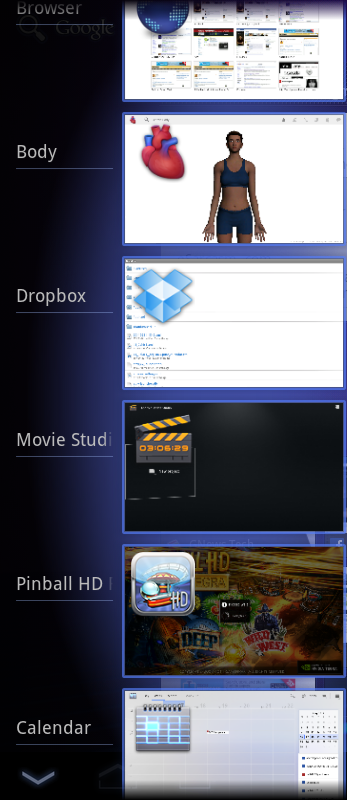
Occasionally, you may see a fourth icon in the bottom-left portion of your screen. This icon, which looks like a small grid, appears when you're using a smartphone app that isn't optimized for the Honeycomb interface. Tapping the icon brings up a list of options for the app; it's the equivalent of pressing the Menu key on an Android phone.
When you work with apps that are optimized for Honeycomb, the grid icon is supplanted by what Google likes to call the 'action bar'. The action bar permits apps to use the top-right area of your screen to provide additional options that change, depending on what you're doing. If you're looking at your inbox in Gmail, for example, you'll see an icon for composing a new message. If you're viewing an individual e-mail message, icons for archiving or deleting the message will appear in the same space.

Customizing Your Tablet

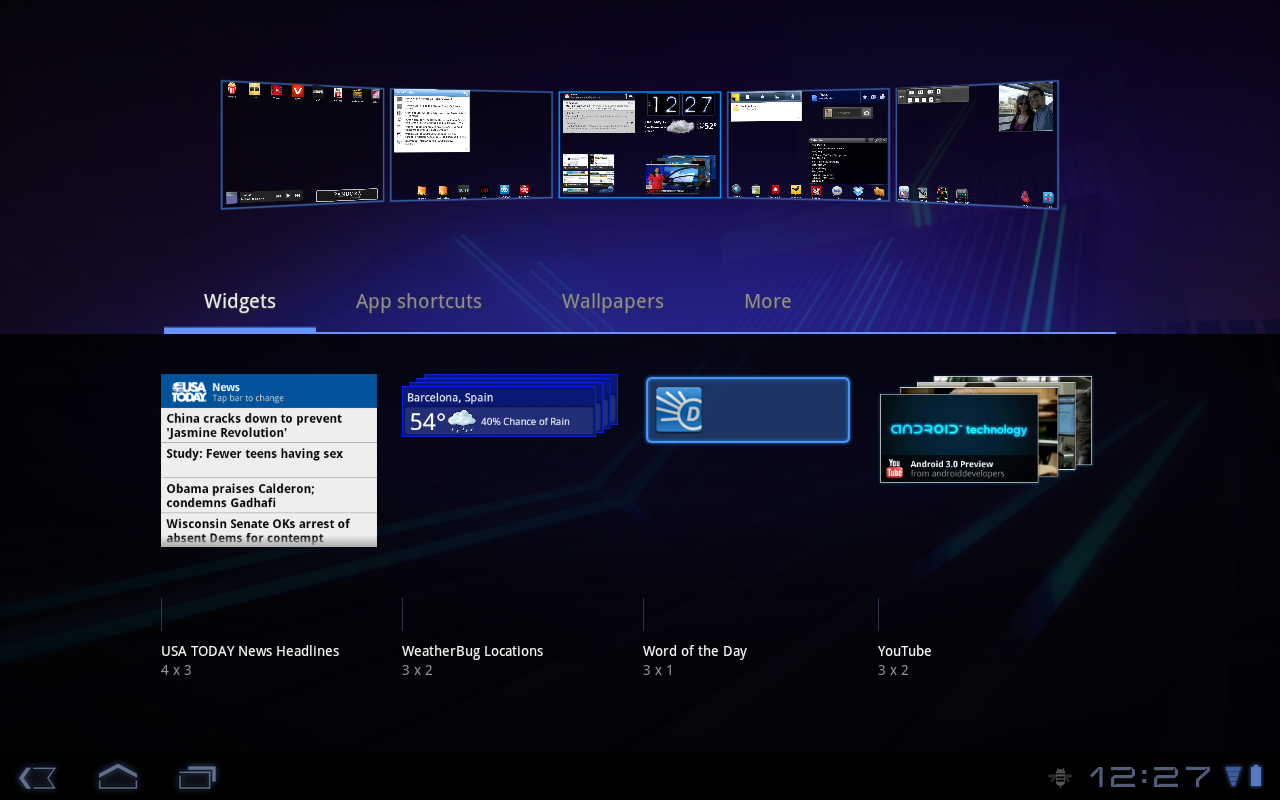
All right--ready to start making your Android tablet feel like your own? Tap the plus sign in the upper right corner of your home screen to head into Honeycomb's customization control center.
Honeycomb customization control center; click for full-size image.Honeycomb's customization control center shows thumbnails of all five home-screen panels plus a list of widgets and app shortcuts.In the control center, you'll see thumbnails of all five home-screen panels and a list of items that you can place anywhere you like. Some of the items are widgets--which are live, functioning versions of programs that run right on your home screen. Others are app shortcuts--normal static icons that launch applications. You can touch any item to drag it to the panel of your choice; you can also adjust things from the home screen later on, by touching and holding any item to move, delete, or (in certain cases) resize it.
So there you have it: the ins and outs of Honeycomb. Now just grab your tablet, dive in, and don't worry: You won't get stung

Samsung Omnia 7 patch resistance resolved using, well... resistors of course (video) (By Engadget Mobile)


Omnia 7 owners just can't get a break. Sure, life seemed dandy after Samsung released a utility that promised to resolve future update headaches, but that assumed everyone would be able to apply the fix. Unfortunately, Sammy's tool requires users to put their phone into download mode to get the patch -- a feat that devices with bootloader v4.10.1.9 simply cannot perform. Understandably, some frustrated folks are taking matters into their own hands after discovering a way to fool the Omnia 7's circuitry, which forces the phone to enter download mode with the help of a 301KOhm resistor (although three 100KOhm resistors in series work fine most of the time). It's not a pretty solution, but seems to be working for many. Hit the break for a video detailing the trickery -- RadioShack will surely appreciate the business.
VIDEO:

Friday, May 20, 2011

Get Unlimited Storage And Unlimited Access Right On Your iDevice (By AppAdvice)


Wouldn’t it be great if you could have unlimited storage on your iDevice and access it from anywhere? Well with the help of some hardware and software this dream can become a reality.

Thursday, March 17, 2011

18 Battery tips and tricks for longer battery life (Android)


If you’re new to owning a smartphone the biggest thing you’ll have to get used to is how often you’ll have to charge your phone. Especially if you’re coming from a phone that was, well, just a phone; it’ll be a big change from charging your phone once  every other week to once every other day. So here are some tips that can help you max at your battery life.
If you try and do all of these it may ruin your Android experience because you’ll be constantly finicking with your battery; thats not what this is for. These are ALL the tips/tricks I know. Even I don’t use all of them. Using just a few of these (possibly even one or two) should be enough that you notice an increase in your battery life.
FOR ALL USERS
1. Turn off of your radios when not using them
Radios are what connect your phone to the rest of the world. You have your general mobile connection, wifi, data/internet connection (3G), GPS, and/or 4G. Those are listed in order from least to greatest in battery consumption. If you’re not using the radio turn it off. If you know you won’t be online for a long time, why turn 3G data on? If you’re at home, use wifi instead of 3G. If you’re not using Google Maps why is your GPS on? You’d be amazed at how much battery life you can save just by turning off the radios that you aren’t using. There are plenty of widgets in the market that will allow you to turn off the radios without even going through settings (Sense users have these widgets packaged in).
2. Vibrate uses more battery
Anytime your phone vibrates a lot of battery is used. This include haptic feedback. A lot of keyboards have the option to turn off haptic feedback and I would recommend it. If you’re a heavy texter you’ll notice very quickly how much longer your phone will last. Also, if you’re in a place where you can easily hear your phone why do you need to have vibrate enabled? If you know you’ll be able to hear your phone there’s no reason for it to be buzzing too.
3. Don’t use task killers
Crazy, right? Especially if you’re on Froyo (Android 2.2) or higher, Android has it’s own task killer that’s actually very good. If programs are using too much memory your Android OS will kill it. A common misconception is that apps run in the background forever; this is not true. If an app is using too much memory (which links to battery life) it’ll be killed by your phone. That’s why if you play a game, check a message, and come back the game is still running. It’s memory usage isn’t that high. However if you put your phone down, walk away for an hour, and the game is still trying to run in the background, there’s a good chance it will be closed before you come back. Separate task managers have to constantly be running in the background which can actually use more battery than it saves. Yes, task managers can use more battery than they save.
4. Do this shenanigans
Originally posted by kthejoker20, this trick came from HTC themselves and can seriously DOUBLE your battery life.
With the phone in the on position.
Fully charge the battery with the phone on… (until the led turns green.)
Once the led turns green, unplug the charger until the led goes off.
After the led goes off, plug the charger back in. When the led turns green , power off the phone.
now…. with the phone fully powered off…
1. Unplug the charger.
2. Wait until led goes off.
3. Plug charger back in until the led turns green. When it turns green, unplug the charger again and go to step 1.
4. repeat steps 1 and 3, 10 times. This may take anywhere from 30 seconds to 30 mins per cycle. Typically only about 1 minute. though.
It takes too much work for me, but I’ve done it once just to test it. It works.
5. Juicedefender
A lovely free app (there’s an extended version called UltimateJuice) that helps your phone save battery. You have to see it to understand it, but anyone who is serious about saving battery needs this app.
6. Don’t use live wallpapers
They look awesome, right? They also use a lot of battery (especially the more complex ones). We’ve all used live wallpapers to show off how cool our phones can be, but for daily use they can KILL your battery.
7. Set your screen timeout to something shorter
Some phones start with their screen timeout at 3 minutes or more. That’s completely unnecessary. While you don’t want it to be instant, you know your preferences. Set it to as low as you see fit. The sooner your screen goes off, the longer your battery life will last.
8. Kill tasks you aren’t using
Not the same as an automated task killer. Find an app in the market that can kill programs MANUALLY. People running AOSP Devices (Android Open Source Project…aka your phone is pure Google and not HTC Sense or some other skin) have the benefit of being able to hold the back button to kill apps.
9. Your camera flash and battery don’t get along
If you like using your camera LED for a flashlight realize that will absolutely MURDER your battery. In all seriousness, your flash uses battery more than any other process on your phone.
10. Low cell signal hurts battery
Your phone is always searching for a stronger signal…This process gets more hectic as the cell signal goes down. So if you’re at one bar your phone’s battery life will drop faster than if you’ve got full coverage. There’s not much you can do here, but if you’re in a place where your phone has little to no signal anyway, you probably won’t be making calls so you might want to just turn on airplane mode or your phone off.
11. Turn off always on mobile data
I know on my Evo the setting is hidden under menu>settings>wireless & networks>mobile networks>disable always on mobile data. What this will do is turn off your internet/data when you’re not using it (specifically after your phone’s been asleep for 5 minutes). It will turn back on shortly if you have a new email or need to sync something.
12. Speaking of syncing…
Check your settings to see what is syncing and when. You probably have things syncing you don’t even use (stocks, news, contacts, etc). You can turn those off and edit the other ones. I don’t need my contacts’ statuses every hour, so my facebook sync is scheduled for once a day rather than the old once an hour. However, I like my weather being up to date so it’s synced every half hour. Find out what you need and how often you want it, and turn the rest off.
13. Don’t use GPS unless you have to
Some apps give you the option to precisely determine your position using GPS, or make a general estimate (usually within 100 meters) based on wifi or 3G data. While this isn’t always the best (like if you’re driving or getting navigated), try to use the 3G connection when it doesn’t really matter. The data radio uses far less battery than GPS.
FOR ROOT USERS
If you’ve rooted your phone you have a few more options. You don’t gain too many more options, but they are even more effective than the ones listed above.
14. Trickle charging kernels
Try and get kernels that use trickle charging. These will really ramp up your battery life.
15. Find out if your phone likes HAVS
Basically, try undervolting kernels and see if your phone likes them. If it does, use them. They change the voltage your phone uses based on your activities and how much battery life you have left.
16. If it doesn’t…
Use the Collin_ph Battery Tweak. That one is specific for the Evo, however there are other builds for other devices. I personally use this and can testify that it works WONDERS.
17. Underclock your phone
Just like SetCPU can overclock your phone, it can underclock it as well. Set it to underclock when the phone is sleeping or even lower the max clocking speed.
18. Try different kernels
Just because he/she said that it works for their phone doesn’t mean it will work for yours. Every phone handles kernels differently. Trying some of them (GIVE THEM A DAY OR TWO TO SET IN) can give you a perfect experience of performance and battery.
Try using these tricks and your battery life will never be better!

Thursday, March 10, 2011

How much memory is left? (Android)


Android storage spaceAndroid storage space

Ever wonder how much storage space is left on your phone or memory card for applications, pictures, music and video? It's pretty easy to check, actually. From the home screen, press the menu button, Then choose Settings, then Storage. (It might be called SD Card & Phone Storage, or something along those lines.) There you'll see the amount of space remaining on your microSD card (if the phone has one) and internal (or program) storage. You can also format the microSD card from here, but make sure you've saved all your pics and music first.

Monday, March 7, 2011

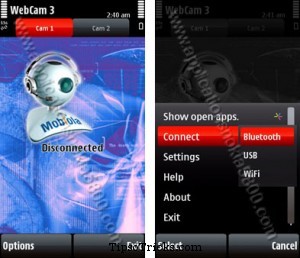
[How-To] Use Your Symbian Smartphone as Web Cam on PC


Do you know that your Nokia (symbian) Smartphones can easily be converted and used as a webcam. The symbian-powered phones has the capability to be used as a PC web cam through a app called “WebCam” by Mobiola Inc.
To turn your nokia smartphone into a high-quality wireless Bluetooth-based web camera all you need to do is to install and configure Mobiola Web Camera.
When you download the app, you’ll get two different versions of app, one for the client applicatoin that resides on the phone, and a webcam PC driver compatible with any Windows application that can receive video feeds from a web camera.
With the Mobiola application you can transform your Nokia symbian based phone in a webcam and connect by USB, WiFi or Bluetooth to your PC.

How to Configure:
1. Download Mobiola Web Cam.
2. Install the application in the computer first.
3. Transfer and install the .sis file in your mobile phone.
First run Mobiola in the PC, then in your Nokia. Choose the connection mode (USB, bluetooth, Wifi) and see thecamera of your phone running on your PC screen.